Single Sign-on (SSO) is a one-step user authentication process. If you are the admin of a HelpDesk account, you can set up SSO with the identity providers (IdP) of your choice. Your technicians can access HelpDesk using the IdP credentials without another password to manage.
Admin of a HelpDesk account can configure SSO to access HelpDesk by signing in to a central identity provider. To set up SSO, you need to first configure your identity provider and then configure your HelpDesk account.
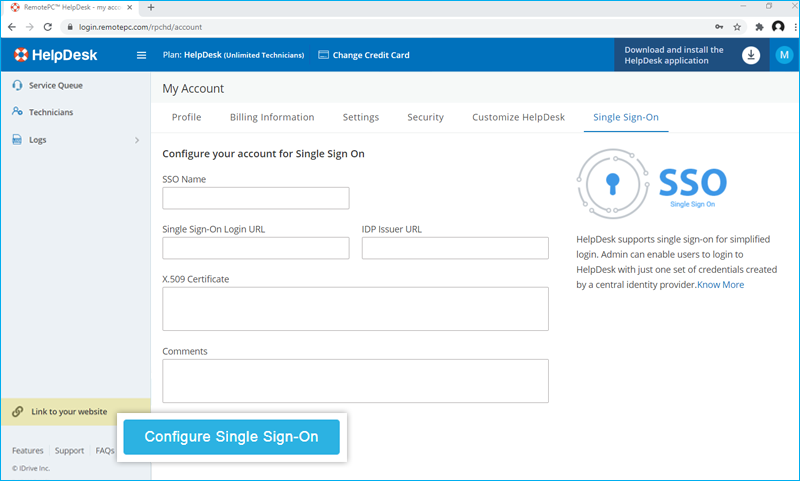
To configure SSO for your HelpDesk account,
- Login to HelpDesk via web browser.
- Fare clic sul nome utente visualizzato nell'angolo in alto a destra e fare clic su "Il mio account".
- Fare clic su "Single Sign-On".
- Inserire un nome per il profilo SSO.
- Inserire gli URL e aggiungere il certificato X.509 ricevuto dall'IdP.
Nota: il certificato X.509 deve essere solo in formato .pem o .cer. - Fare clic su "Configura Single Sign-On".
Riceverete un'e-mail quando l'SSO sarà abilitato.
Admin of HelpDesk accounts can either select SSO for login while inviting technicians to create an account or enable SSO for existing technicians.
To invite technicians to use SSO,
- Log in to HelpDesk via web browser.
- Go to the 'Technicians' tab and click 'Add'.
- Enter the email address in the 'Email Address' field.
- Select group and other preferences for the technician.
- Selezionare "Abilita SSO".
Note: If you select the checkbox, technicians won't have to set a password for their account.
- Fare clic su "Invita".
To enable SSO for existing technicians,
- Login to HelpDesk via web browser and go to the 'Technicians' tab.
- Hover on the technician you want to edit and click
 .
. - Selezionare "Abilita SSO".
- Fare clic su "Salva".

Sì, gli amministratori possono rimuovere un profilo SSO dal proprio account.
Per rimuovere il profilo SSO,
- Login to HelpDesk via web browser.
- Fare clic sul nome utente visualizzato nell'angolo in alto a destra e fare clic su "Il mio account".
- Fare clic su "Single Sign-On".
- Cliccare
 corrispondente al profilo SSO che si desidera eliminare.
 - Click'Delete' in the confirmation popup to remove the SSO profile.
Deleting the SSO profile will remove Single Sign-On for all technicians linked with this profile and they will have to use their registered email and password for login.
To disable SSO for a technician,
- Login to HelpDesk via web browser and go to the 'Technicians' tab.
- Hover on the technician you want to edit and click .
- Deselezionare la casella di controllo "Abilita SSO".
- Fare clic su "Salva".
Se si disattiva il single sign-on per un utente, questi dovrà impostare una nuova password per il proprio account. Una volta fatto, l'utente dovrà utilizzare il proprio indirizzo e-mail e la nuova password per accedere.
Sì, è possibile configurare il proprio provider di identità per l'SSO con una serie di parametri descritti di seguito:
- HelpDesk uses SAML2 with the HTTP Redirect binding for HelpDesk to IdP and expects the HTTP Post binding for IdP to HelpDesk.
- Durante la configurazione con SAML, utilizzare i seguenti URL e salvare le modifiche.
- Single sign on URL:
https://www.remotepc.com/rpchd/sso/process - Audience URL (SP Entity ID):
https://www.remotepc.com/rpchd/sso/metadata
- Single sign on URL:
- Il fornitore di identità può chiedere se si desidera firmare l'asserzione SAML, la risposta SAML o entrambe.
To login in to SSO enabled account via desktop,
- Fare clic su "Single Sign-On (SSO)" nella schermata di accesso.
- Enter 'Email Address' and click 'Login'. You will be redirected to IdP web login page.
- Inserire il nome utente e la password registrati con l'IdP, quando viene richiesto di inserire le credenziali.
Upon successful validation of identity, you will be prompted to go back to the desktop application and you can now continue using your HelpDesk account.
Per accedere all'account abilitato SSO tramite desktop,
- Fare clic su "Single Sign-On (SSO)" nella schermata di accesso.
- Inserire l'indirizzo e-mail e fare clic su "Login". Si verrà reindirizzati alla pagina web di accesso dell'IdP.
- Inserire il nome utente e la password registrati con l'IdP, quando viene richiesto di inserire le credenziali.
Upon successful validation of user identity, you will be prompted to go back to the desktop application and you can now continue using your HelpDesk account.